This is default featured slide 1 title

Go to Blogger edit html and find these sentences.Now replace these sentences with your own descriptions.This theme is Bloggerized by Lasantha Bandara - Premiumbloggertemplates.com.

This is default featured slide 2 title

Go to Blogger edit html and find these sentences.Now replace these sentences with your own descriptions.This theme is Bloggerized by Lasantha Bandara - Premiumbloggertemplates.com.

This is default featured slide 3 title

Go to Blogger edit html and find these sentences.Now replace these sentences with your own descriptions.This theme is Bloggerized by Lasantha Bandara - Premiumbloggertemplates.com.

This is default featured slide 4 title

Go to Blogger edit html and find these sentences.Now replace these sentences with your own descriptions.This theme is Bloggerized by Lasantha Bandara - Premiumbloggertemplates.com.

This is default featured slide 5 title

Go to Blogger edit html and find these sentences.Now replace these sentences with your own descriptions.This theme is Bloggerized by Lasantha Bandara - Premiumbloggertemplates.com.

Senin, 07 Oktober 2019

Jaringan Legacy VLAN Routing

Membuat Jaringan Legacy VLAN Routing


Pertama tama buatlah seperti digambar ini 


Lalu Setting lah Pc 0 Dan 1 seperti Digambar 

Setelah kedua PC sudah di isi Ip Address , SubnetMask ,Gateway

1. Klik Switch 
2. Lalu Klik Sub menu CLI ( Seperti Terminal atau console )

Konfigurasi Pada Switch :

Switch>enable
Switch#configure terminal

Switch(config)#vlan 190
Switch(config-vlan)#name TI
Switch(config-vlan)#vlan 210
Switch(config-vlan)#name SI
Switch(config-vlan)#exit

Switch(config)#interface fa0/1
Switch(config-if)#switchport mode trunk
Switch(config-if)#exit

Switch(config)#interface fa0/2
Switch(config-if)#switchport mode trunk
Switch(config-if)#exit

Switch(config)#interface fa0/3
Switch(config-if)#switchport mode access
Switch(config-if)#switchport access vlan 190
Switch(config-if)#exit

Switch(config)#interface fa0/4
Switch(config-if)#switchport mode access
Switch(config-if)#switchport access vlan 210
Switch(config-if)#exit
Switch(config)#exit
Switch#


Setelah switch terkonfigurasi  Lalu Konfigurasi router

Konfigurasi Pada Router :

Router>enable
Router#configure terminal

Router(config)#interface G0/0.190
Router(config-subif)#encapsulation dot1Q 190
Router(config-subif)#ip address 172.17.11.1 255.255.255.0
Router(config-subif)#exit
Router(config)#interface G0/1.210
Router(config-subif)#encapsulation dot1Q 210
Router(config-subif)#ip address 172.17.30.1 255.255.255.0
Router(config-subif)#exit
Router(config)#interface G0/0
Router(config-if)#no shutdown
Router(config-if)#exit
Router(config)#interface G0/1
Router(config-if)#no shutdown
Router(config-if)#exit


Setelah sudah terkonfigurasi Router nya saya akan test koneksi dari pc.

Cara nya :

1. Klik PC 0
2. Klik Command Prompt
3. Setelah itu klik perintah ipconfig untuk mengetahui ip address,subnetmask,gateway PC 0 
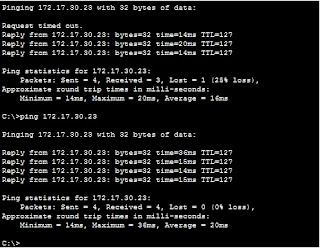
4. Test Ping dengan cara " Ping 172.17.11.23 " Ip address 172.17.30.23 adalah alamat PC1
5. jika test ping reply  Maka Sudah Terkoneksi satu sama lain

seperti dibawah gambar ini 


Selamat mencoba. dan semoga bermanfaat